Growing, Harvesting, Transporting, Storing and
Planting Bare Root Plants
What
is a bare root?
Technology has changed the industry in many ways over the last 100
years. Prior to the development of the gas engine, all nursery stock was
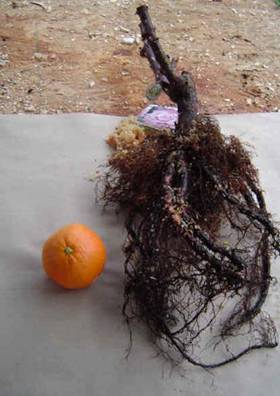
harvested and shipped bare-root due to weight considerations. Bare-root is when
a plant and its roots are removed from the soil and sold this way. This limited
the harvest and planting season to a few weeks in springtime.
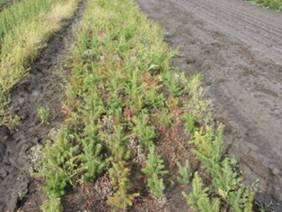
Bare-root plant production involves growing plants in rows or beds
for one to three years. These plants are then harvested by removing the plants
and roots from the soil. These plants may then be sold, planted in soil again
or placed in containers to be grown into larger plants.

What
kind of site can you use to grow bare root?
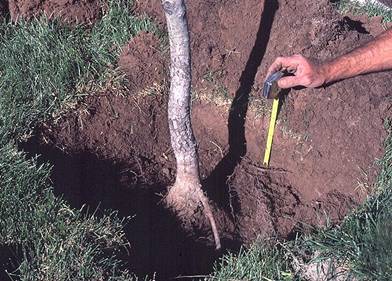
Fields being considered for nursery stock production should have a
minimum of 8 to 10 inches well-drained profile. A soil probe can be used to
determine the soil profile. Soil type can be sandy for bare root production.
Heavy clay soils should be avoided due to poor drainage and aeration, but can
be improved by the addition of organic matter or several years of a green
manure crop..
The best sites for field production have moderate slope for air
and water drainage, or if flat, have good internal soil water drainage. Nursery
stock that has been flooded is often weakened and predisposed to increased
disease and insect problems. Soils should be tested to
determine whether the pH needs adjusting, and if particular nutrients need to
be incorporated prior to planting. Soils should be tested for pH, P, K and
certain micronutrients, and possible pesticide residues, depending on prior
uses of the site. Soil pH should range from 6 to 6.5 for most plants, lower (5
to 6) for acid-loving plants like azaleas. Fields should be plowed and disced prior to planting. Most planting is done in the
spring, with some also in the fall. On some sites, depending upon plant
spacing, erosion potential and other factors, it may be desirable to establish
a cover crop.
Do
you have to irrigate the plants?
Considerable field production is done without any supplemental
irrigation, but this increases the potential for poor growth and survivability.
Some fields are irrigated on an "as needed" basis with portable
overhead systems (rainreels, moveable pipes, etc.),
with the ideal situation being to have drip irrigation available for all
plants. Water source, water quality, soil type, plant type and spacing, climate
and topography must all be considered when designing an irrigation system, with
each type of system having advantages and disadvantages.
How
do you control for weeds?
Many nursery fields are chemically treated or fumigated prior to
planting to help control weed problems prior to planting. Weeds are also
controlled by applying herbicides (both preemergent
and postemergent), mulching, hand weeding, mowing,
and cultivating.
Should
the soil be amended?
Most soils benefit from the addition of organic matter. In
addition to improving soil structure, water retention and drainage, aeration,
and the quality of nursery stock grown, digging is usually easier in mineral
soils that have been amended with organic matter. Also, some nursery species
develop a more fibrous root system as the amount of organic matter is increased.
An alternative to applying organic materials over the entire field
is to incorporate the organic matter in planting rows only.
What
should the planting density be like?
Spacing is always a concern in new fields, especially if you are
uncertain about the size of plants you will need or about the market for your
crops. If you anticipate that you will sell trees to professional landscapers
or that they will be used as municipal street trees, space them wider to allow
for more growth before they become crowded and so that you will have better
access during harvesting. Wider spacing is also encouraged if the market
strategy is uncertain, because it allows more opportunity for finding a market
before the trees become overgrown. In choosing planting dimensions, it is
important to account for space required by fertilizing, cultivating, mowing,
and spraying equipment. Each tree is considered to “own” half the space between
it and the next tree or row for calculations such as the number of trees per
acre. In reality, the canopies and roots may exceed half the distance by
harvest time.
One
method of increasing planting density is to plant some species, such as
dogwoods, 3 feet apart within rows and after two years, dig and sell every
other plant down the row. The following season, the remaining trees would have
additional space to develop caliper and full, well-branched canopies. In
theory, this method seems like a good idea. The critical issue with this plan
is that you must have a sales mechanism in place for the trees that are dug
after two years. If all the alternating trees are dug and sold, or possibly
containerized to be sold during the current season, this plan may be feasible.
However, in many cases, if the grower has no immediate market for the smaller
trees or place to hold them, then the entire crop becomes over-grown and
diminishes in value. Spacing between
seedlings is 6"x 6" and is accomplished by eye while planting. Soil
moisture is critical and the bed may require watering prior to planting.
How
do you harvest bare root?

Some techniques with larger nurseries involve machine digging with
a tree spade. Tree spades are equipped with three or four hydraulic blades that
extract a cone of soil and roots, which are placed in a wire basket, but this
method is usually used for balled and burlapped
trees.
A grower of bare-root liners will likely use a "U"-blade
or lifter to cut the roots, lift the plant and shake much of the soil from the
plant while in the field.
Total Time to Harvest: Two years from sowing in the woody beds to
harvest as bare root seedlings.
Harvest Date: Dormant bareroot plants
are harvested in early to mid-December
Do
you have to prune the bare root seedlings?
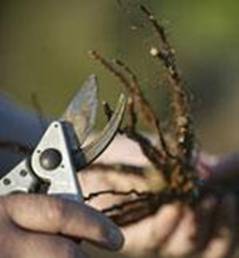
Pruning may be
necessary for seedlings with extremely long roots. However, prune
conservatively because seedlings will die soon after planting if they do not
have sufficient root area to absorb water. Always prune with a sharp tool such
as
hand pruners or garden shears. Prune
in a cool place where seedlings are out of the wind and sun. Handle roots as
little as possible. In general, seedlings can have their roots pruned 8 to 10
inches below the root collar. The root collar is the point on the main stem
identified by a change in color or slight swelling in the stem. Larger seedlings
(3-year-old or transplanted seedlings) require a larger root system, so don’t
over-prune these. When you are done, re-moisten the seedlings and re-seal them
in the original packaging.
How
do you transplant bare root?
Seedlings can be
damaged by overheating, too little moisture, and physical damage during
transportation. A refrigerated truck is
the best way to transport your seedlings safely. If refrigerated transport
is not available
or travel distance is short, protect seedlings from sun, wind
and excessive drying by:
1. Placing foam insulation or spacer boards
under the boxes and leave gaps around boxes.
2. Covering packages with a light-colored or
reflective tarp to protect against the sun.
3. Traveling in the early morning when
temperatures are cooler.
4. Using ice packs, snow, or a large cooler to
keep seedlings cool.
Do not place
seedlings in a hot car trunk or leave them in a sunny location. If you suspect
the seedlings have not been kept consistently cool since leaving the nursery,
sprinkle cool water on them and reseal the packages. Consider
transporting the seedlings in stages during the workday.
How
do you store bare root before planting?
If you cannot plant immediately, store them properly until you can
plant. Moisture loss is the greatest threat to the survival of bare root
plants. Exposure to room temperature and humidity will cause bare root plants
to lose as much as two to three percent of their fresh weight in moisture every
hour. Such an exposure for even overnight can easily result in the plant's
death. Preventing desiccation should be your highest priority in handling bare
root perennials. Store the plants as close to but not below 32 deg. F, as you
can, until you are ready to plant them.
Keep them in their shipping bags until planting time. Shade the
bags so the roots will not heat up. Don't leave an unprotected plant lying on
the ground while preparing the planting hole. Dessication
can occur rapidly on a sunny and breezy spring day. Water the plant thoroughly
to settle it into the soil and get it off to a good start.
Bare root plants can be held in cold storage with their roots
exposed or packed in damp moss or other material; they can also be process (or
peat) balled where their roots are surrounded by organic matter that is then
packaged to look like a root ball; they can also be containerized or potted in
a container with soilless substrate. There are also
many new (and largely untested) products that may reduce dessication
of bare root plants during storage. These products may be root dips, gels, or
clay products designed to maintain a high moisture environment around roots.
Storage Conditions: Bareroot plants are bundled into groups of 25 (or whatever is manageable), and long roots are trimmed. Bundles are placed into plastic bins with drainage holes. The roots are covered with sawdust and the bins are placed into cold storage (40ºF) and watered as needed during the winter.
Storage Duration: December to mid-March.
How
do you plant bare root plants?
Steps:
1.
Plant bare-root trees and shrubs in
winter and very early spring (from mid-November to mid-March in most parts of
the country) when the plants are dormant and the ground isn't frozen solid.
They'll have a chance to put out new roots before they have to cope with hot
sun, drying winds and the added stress of producing leaves.
2.
Remove any packing material
carefully, and rinse off or gently pull off any clumps of earth clinging to the
roots; clip off any dead or damaged roots.
3.
Immerse the roots in a bucket of
water to soak for at least one to four hours, but no longer than overnight.
Supplying enough moisture is key to the success of
bare-root planting.
4.
Dig a hole that's at least two feet
wider than the root system and about as deep as the point where the roots flare
from the trunk (or stems in the case of a shrub). Using your shovel, loosen the
soil on the sides of the hole so it doesn't solidify around the plant's roots.
5.
Mound soil in the bottom of the
hole so that the peak reaches just about ground level.
6.
Place stakes in the hole if you're
planting a tree that will need support
7.
Set the tree or shrub on top of the
mound so the roots cascade down over the sides. Spread them gently with your
hands if you need to, and add or remove soil so that top of the root system is
just at ground level.
8.
Fill the hole about halfway with
soil and tamp it lightly with your foot to remove large air pockets.
9.
Make sure the tree or shrub is
standing straight up, then water slowly to saturate the soil and remove any
remaining air pockets.
10.
Finish filling the hole with soil.
Use any extra to build a temporary berm above the
perimeter of the roots and water again.
11.
Keep the soil moist for the first
year after planting. Mulch to retain moisture, but keep at
least six inches bare around the trunk. Check frequently; if you see
yellow leaves or the soil feels dry, water immediately.
Tips:
Unless you're planting a small shrub or a street or patio tree in
a small, confined space, avoid amending (improving) the soil in the planting
hole. The "good" soil will encourage the roots to confine themselves
within that small area rather than spread out as they need to, and the result
will be a weak plant. Instead, choose trees and shrubs that thrive naturally in
your soil conditions.
Deep, thorough watering is the key to healthy shrubs and trees.
Give new trees at least an inch of water a week all around the root zone. (The
roots of a woody plant extend about the same distance as its branches).
What
are some advantages and disadvantages to using bare root?
A major advantage to using bare root plants is their light weight
and relatively low cost but there are several advantages. Bare-root trees can be produced less expensively than trees
produced in other systems due to easier digging, storing and shipping, since
the soil is not kept with the roots when the tree is dug. The root system can
be inspected, and inferior or defective roots can be removed. Some
disadvantages are the range of tree sizes is limited in bare-root transplants
due to the inability to move larger trees successfully. Seasonal constraints
are greater in this production system because bare-root trees should be dug and
transplanted during the dormant season (December-March). Careful handling of
bare-root transplants is necessary to avoid root desiccation. Bare-root trees
often require staking to avoid windthrow
following leaf emergence.
What
plants can you propagate as bare root?
Bare root production and harvesting is generally restricted to
small groundcover, herbaceous perennial and ornamental grass divisions, and
small deciduous shrubs and trees. Due to the potential for desiccation, few
evergreen shrubs or trees are harvested bare root, with the exception of small
conifer liners for Christmas tree planting and reforestation
Sources:
http://www.agr.state.nc.us/agscool/commodities/plantkid.htm
http://www.ehow.com/how_16021_plant-bare-root.html
http://www.ext.vt.edu/departments/envirohort/factsheets2/annperbulb/mar88pr6.html
http://www.ext.vt.edu/pubs/nursery/430-050/430-050.html
http://www.ces.ncsu.edu/depts/hort/nursery/cultural/topic11.htm
http://www.dnr.state.wi.us/org/land/forestry/Publications/seedling_broch_web_small.pdf
Maddi
Schweitzer, 2005